319,90€
Your cart is empty
Search on Crosscall
Search suggestion
We recommend
See all
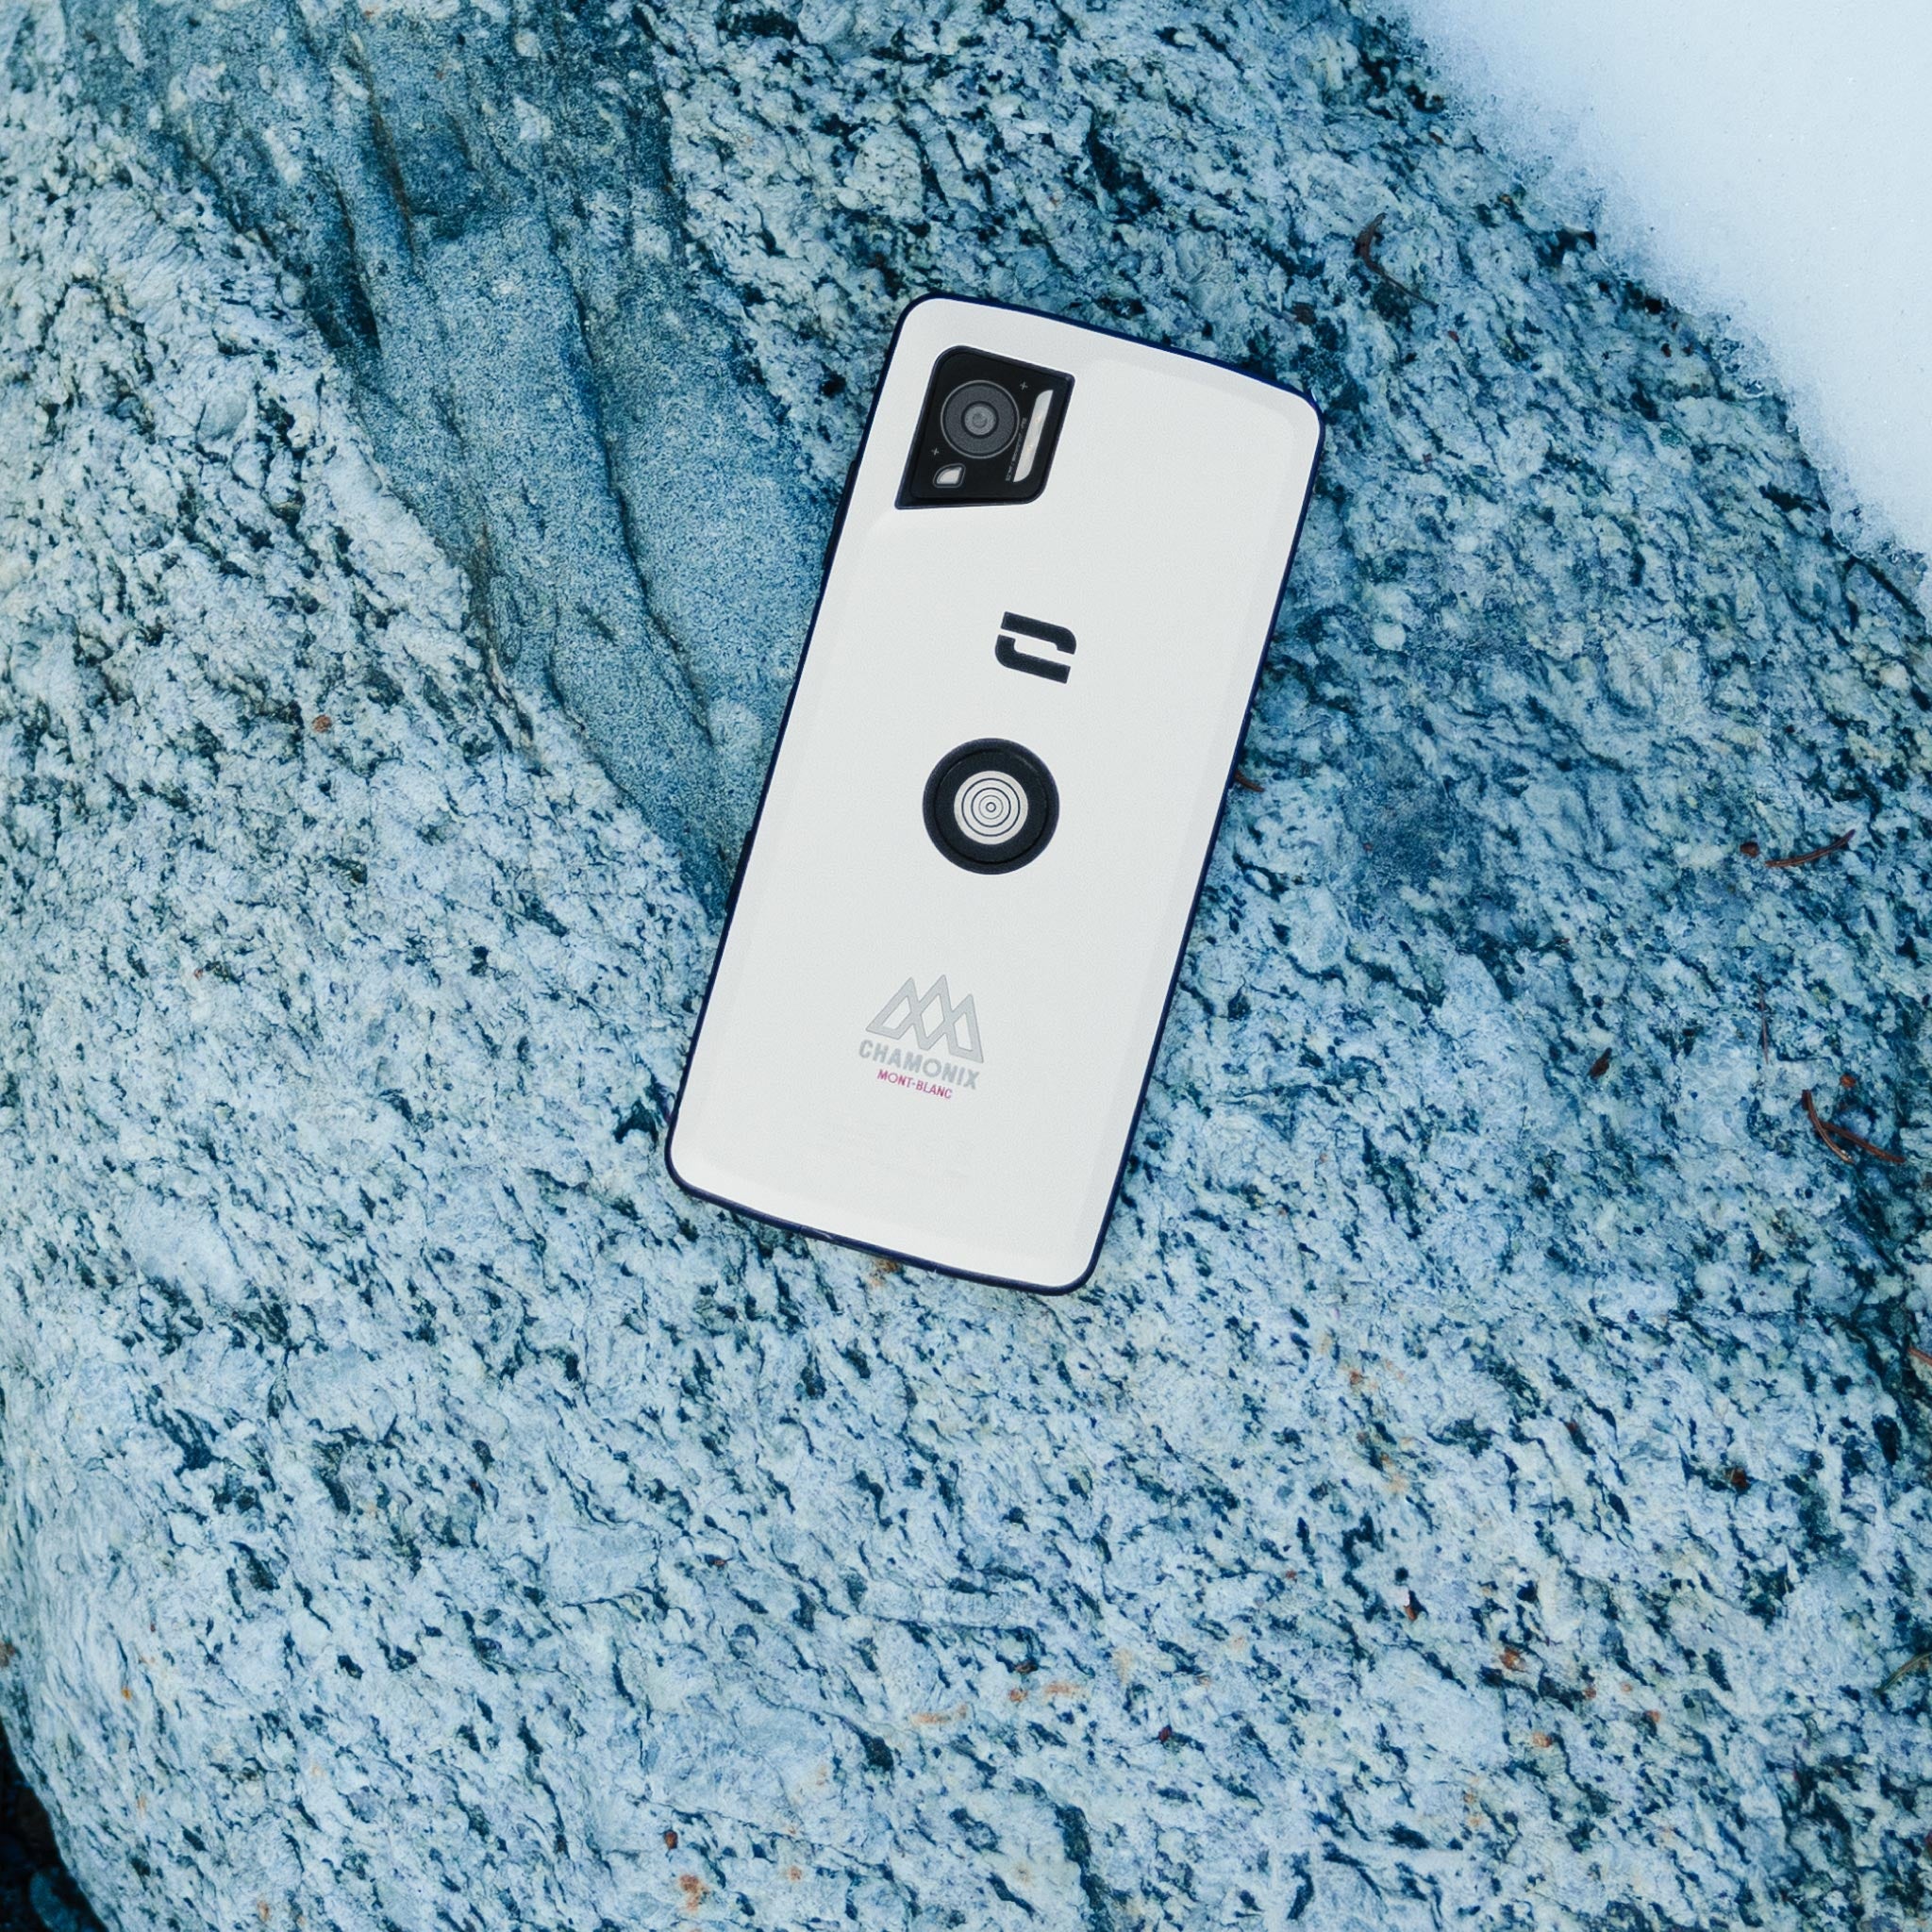

Class40 CrossCall World Championship crowned champion
One year after its launch, the Class40 Crosscall won the World Championships in its class this weekend in La Rochelle. This title confirms the full potential of this prototype, which combines innovation and sustainability, as well as that of its skipper, who has an unconventional background. After winning two world titles in freeride skiing, Aurélien Ducroz adds a new world title to his list of achievements, once again demonstrating his thirst for victory and his ability to lead ambitious projects. Aurelien Ducroz: “I’ve won two world titles in skiing; this is my first in sailing—it’s extraordinary! We sailed well during the first three days of the championship, with three strong races, always in the leading group. It came down to the maneuvers, and we were pretty good at that. We’re obviously frustrated that we couldn’t do more, but now we can only be happy with the result! Racing as a crew reminded me of the Tour de France à la Voile, which I did in a Diam24 for three years in a row… You get back into the swing of things, even if it’s a bit physically demanding on these boats, but it was a lot of fun. Working with Vincent Riou was just extraordinary. Sailing with someone who has so much experience is a real privilege and a true pleasure. I’d also like to thank him immensely, as well as everyone else who was on board: David Sineau, Eric Levet, Thomas Audren, and of course my boat captain Jonathan Chodkiewiez, with whom I’m very happy to have shared this moment. I’m incredibly proud to bring this World Champion title to this wonderful project that we’ve been building since last year with my partners on the Crosscall Sailing Team, led by Crosscall, who were the first to place their trust in me for the construction of our prototype.” CLASS40 WORLD CHAMPIONSHIP PODIUM 1. CROSSCALL 166) – Aurélien DUCROZ 2. INTER INVEST (175) – Matthieu PERRAUT 3. REDMAN (161) – Antoine CARPENTIER UPCOMING RACES July 17: Start of the Drheam Cup, a solo race, in Cherbourg. November 6: Start of the Route du Rhum to Guadeloupe.

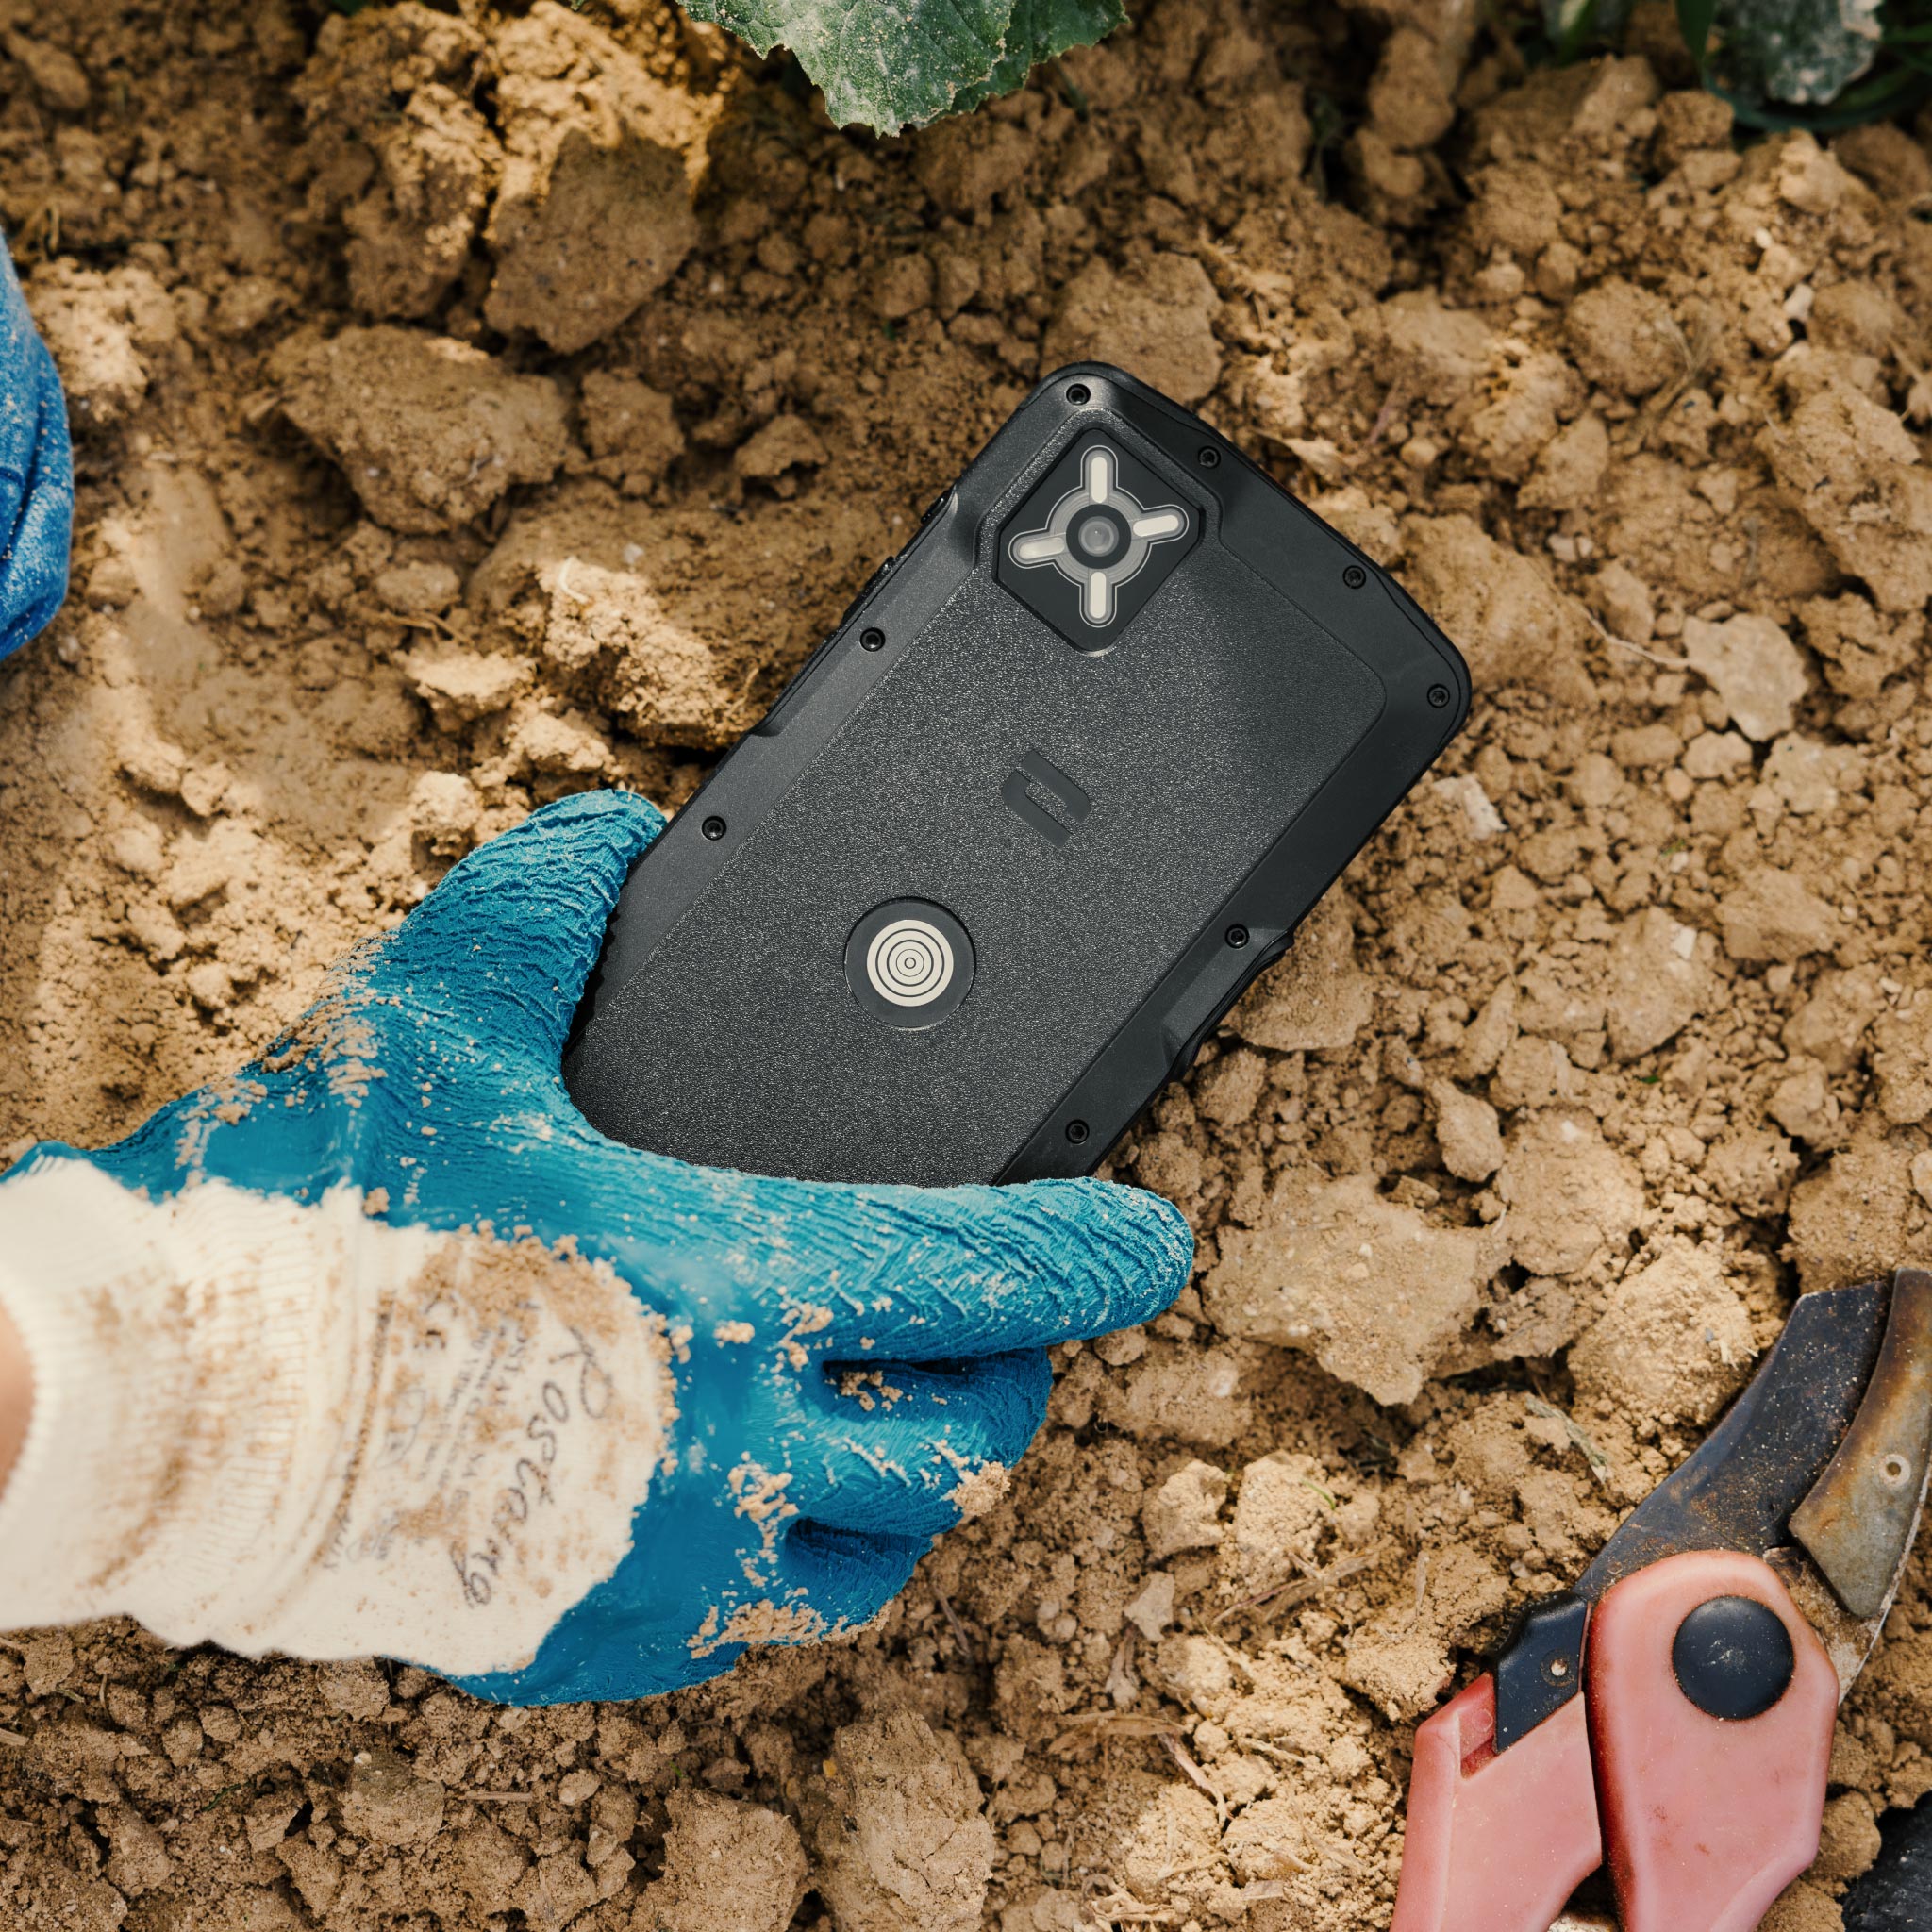
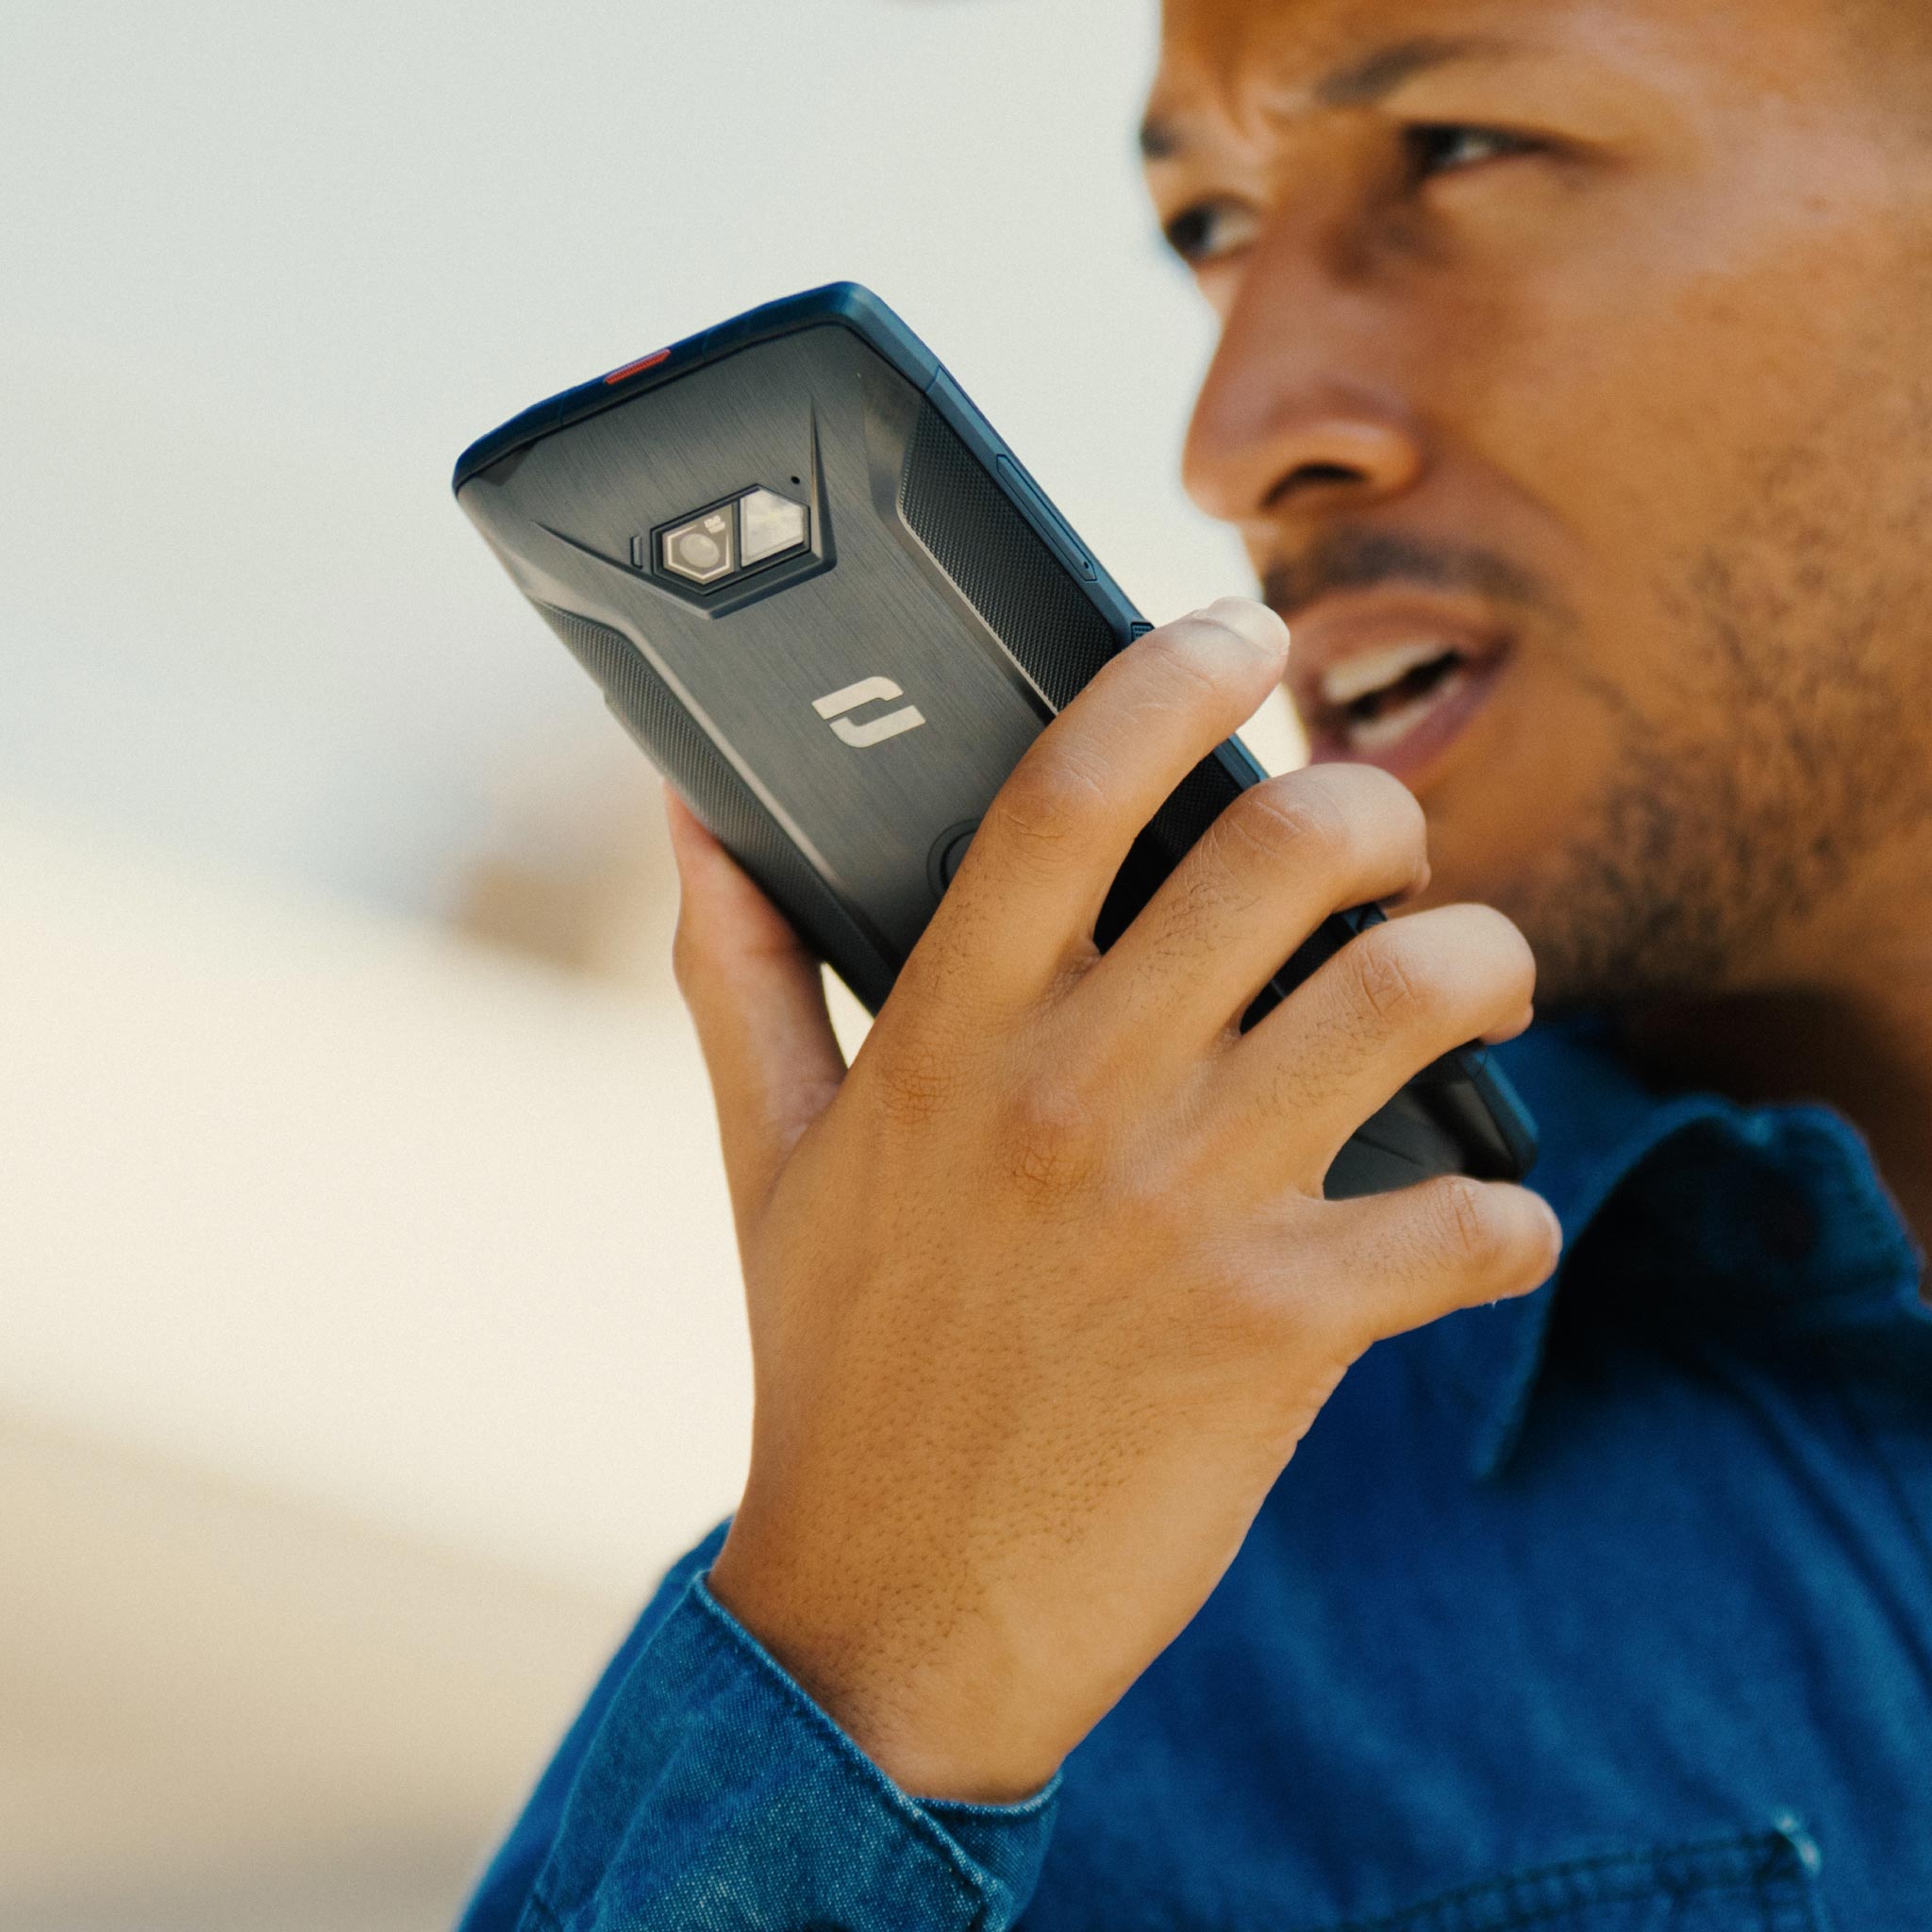
HOW TO TURN YOUR SMARTPHONE INTO A WALKIE-TALKIE?
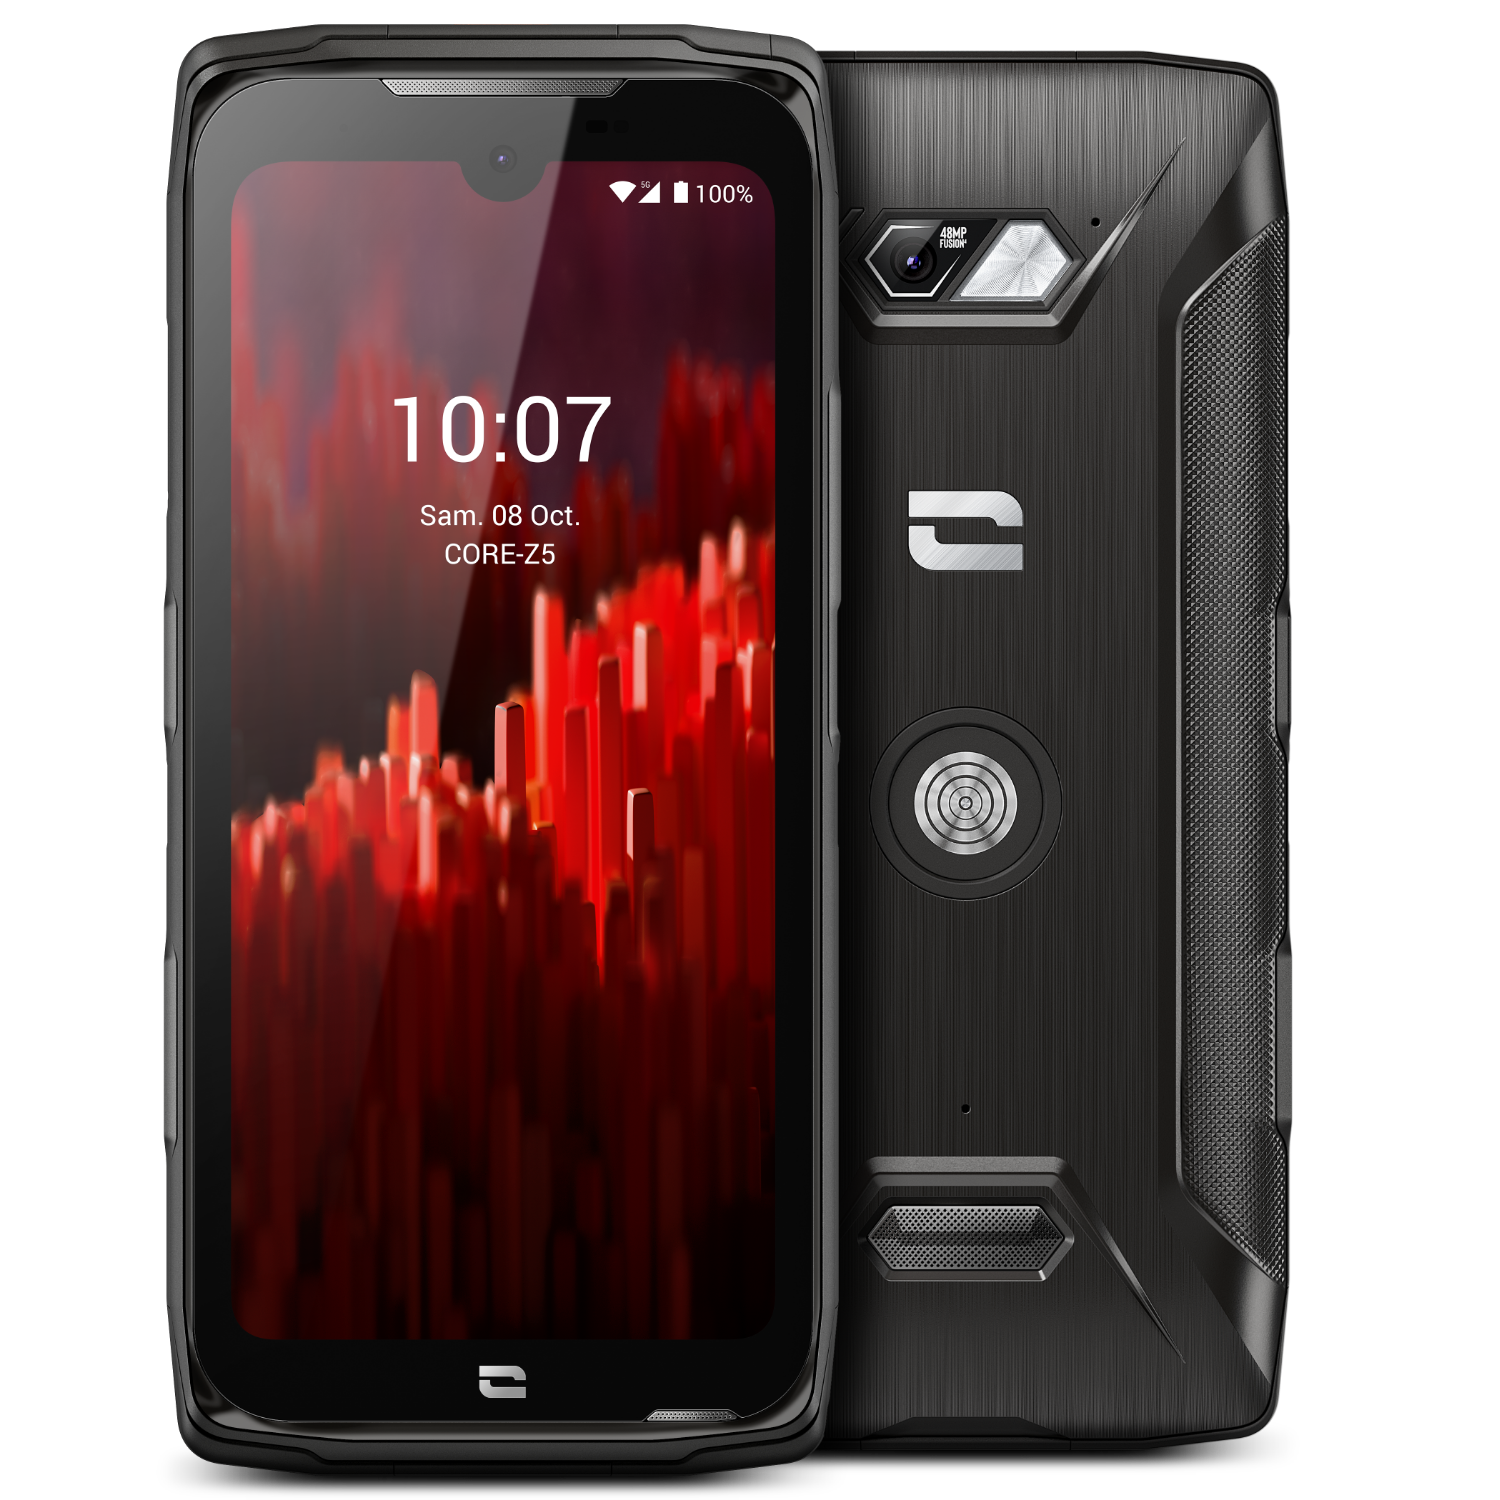
The walkie-talkie is the gadget everyone loves. Used to coordinate teams in the field, it’s also very handy for communicating with friends during a mountain biking or hiking trip. Now, thanks to Push-to-Talk (PTT) apps, you can turn any smartphone into a real walkie-talkie. PUSH-TO-TALK (PTT) APPS The concept behind a Push-To-Talk app can be summed up simply: Press, talk! As you can see, it works exactly like a walkie-talkie. In short, Push-To-Talk apps let you create chat groups where you can communicate verbally, instantly, with the press of a single button. Unlike a traditional walkie-talkie, Push-To-Talk apps use 3G/4G/WiFi networks, which limits their use to areas with coverage but, conversely, allows for unlimited range. X-TALK, THE FREE WALKIE-TALKIE APP DEVELOPED BY CROSSCALL At CROSSCALL, we’ve developed our own walkie-talkie app: X-TALK. Available on all Android smartphones, this app CROSSCALL all CROSSCALL owners CROSSCALL a chat group and communicate instantly with group members. Once launched, X-TALK lets you follow a conversation or directions without having to pick up your phone. Talking couldn’t be easier—just press a button and you’re on the air. The new CROSSCALL smartphones CROSSCALL also equipped with a dedicated button for this feature, ensuring quick and easy access. With X-TALK, you can also share your location with the entire group. SET UP A PUSH-TO-TALK APP ON A PROGRAMMABLE BUTTONIf you own a CROSSCALL any other phone equipped with a programmable button, you can configure this button so that each time you press it, you’ll communicate directly via your Push-To-Talk app within the group of your choice.To set up a Push-To-Talk app on a CROSSCALL smartphone CROSSCALL Go to Settings, then Buttons Then, under Dedicated Button, tap the blue gear icon next to Custom Select the Push-To-Talk app, and you’re all set! To configure the button in the X-TALK app: Open the X-TALK app Tap the three dots in the top right corner Then select “Configure PTT Button” Follow the instructions

Pour vous permettre de profiter pleinement des fonctionnalités de votre CROSSCALL, voici quelques astuces liées à l’utilisation d’Android. Les smartphones CROSSCALL évoluent sous le système d’exploitation Android, une plateforme qui représente 80% des terminaux présents sur le marché. Afin de vous offrir toujours plus de confort d’utilisation et de fluidité, ses fonctionnalités sont en perpétuelle évolution. C’est la raison pour laquelle nous avons souhaité vous proposer quelques conseils et astuces de manière à ce que vous puissiez profiter pleinement de votre Action Phone signé CROSSCALL. COMPTE GOOGLE [ASTUCE ANDROID – COMPTE GOOLE] Avant toute chose et si ce n’est pas déjà fait, créez-vous un compte Google. Android étant le système d’exploitation créé par Alphabet, vous pourrez ensuite profiter de toutes ses fonctionnalités : Gmail, Youtube, Google Drive, ou encore Google Calendar et Contact. Vos données seront automatiquement synchronisées entre vos différents appareils connectés. Pour créer un compte il suffit simplement de vous rendre sur le site de GOOGLE. Ps: Créez ce compte sérieusement et gardez de coté votre adresse et mot de passe. Si vous perdez votre téléphone, vous pourrez récupérer les contacts et même géolocaliser l’appareil directement via votre ordinateur. RÉGLER LA DATE ET L'HEURE [ASTUCE ANDROID – DATE ET HEURE] Vous voulez faire un petit voyage dans le temps ou simplement régler la date et l’heure de votre smartphone ? C’est très simple : 1. Ouvrez les paramètres de votre téléphone depuis le menu principal.2. Faites dérouler le menu jusqu’à l’onglet « Date / Heure » et cliquez dessus.3. Vous pouvez choisir le réglage manuel ou automatique de l’heure. Ps : Le réglage automatique fonctionne grâce au réseau internet. Si vous vous connectez sur un réseau Wi-Fi à l’étranger, l’heure devrait se mettre à jour automatiquement. CAPTURE D'ÉCRAN [ASTUCE ANDROID – CAPTURE D’ÉCRAN] Vous souhaitez conserver une trace d’une information sans avoir à la noter, ou tout simplement capturer le snapchat d’un ami ? La capture d’écran est la meilleure solution ! C’est très simple : 1. Appuyer simultanément sur le Bouton volume du bas et le bouton Power.2. Retrouver votre capture d’écran dans votre Galerie photos. Ps : N’oubliez pas que si vous faites le Screenshot du Snapchat d’un ami, il sera informé de votre action ! SUPPRIMER LE SON / LES VIBRATIONS DE VOTRE CLAVIER TACTILE [ASTUCE ANDROID – SON ET VIBRATION DU CLAVIER] Vous souhaitez supprimer le son et/ou les vibrations des touches de votre clavier ? C’est très simple : 1. Ouvrez les paramètres de votre téléphone depuis le menu principal.2. Faites dérouler le menu jusqu’à l’onglet « Sons et notifications » et cliquez dessus.3. Cliquez sur l’onglet « Autres sons ».4. Vous pouvez choisir d’activer ou désactiver le son et les vibrations de votre clavier tactile. INSTALLER UNE APPLICATION [ASTUCE ANDROID – INSTALLER/DÉSINSTALLER UNE APPLICATION] Le Play store vous permet d’accéder à plus d’un million d’applications que vous pouvez installer. Pour installer une application, c’est très simple : 1. Ouvrez le Playstore.2. Recherchez l’application souhaitée dans la barre de recherche.3. Cliquez sur l’icon de l’application que vous souhaitez télécharger.4. Cliquez sur le bouton « installer » pour une application gratuite ou sur « acheter » pour une application payante.5. L’installation commence. Une fois celle-ci terminée, un raccourci est créé dans le lanceur d’applications. Vous pouvez ensuite la déplacer sur votre page d’accueil (cf. comment déplacer une application). DÉSINSTALLER UNE APPLICATION [ASTUCE ANDROID – DÉSINSTALLER UNE APPLICATION] Les applications occupent beaucoup d’espace sur la mémoire de votre téléphone. Il faut donc faire un peu de ménage de temps à autres en supprimant les applications que l’on utilise plus. Pour désinstaller une application, c’est très simple : 1. Ouvrez le Playstore.2. Recherchez l’application souhaitée dans la barre de recherche.3. Cliquez sur l’icon de l’application que vous souhaitez désinstaller.4. Cliquez sur le bouton « Désinstaller ». Si vous avez acheté cette application, l’achat restera enregistré sur votre compte Google, vous permettant de la télécharger à nouveau et gratuitement. DÉPLACER UNE APPLICATION SUR L'ÉCRAN D'ACCUEIL [ASTUCE ANDROID – DÉPLACER UNE APPLICATION SUR L’ÉCRAN D’ACCUEIL] Android vous permet de déplacer les icônes de vos applications sur votre écran d’accueil de manière à y accéder plus rapidement. Comment faire ? C’est très simple : 1. Exercez une pression prolongée de votre doigt sur l’icône de l’application à déplacer jusqu’à ce que l’écran se dédouble.2. Sans relâcher la pression de votre doigt, faites glisser l’icône à l’endroit voulu.3. Vous pouvez relâcher votre doigt. CRÉER UN DOSSIER D'APPLICATIONS [ASTUCE ANDROID – CRÉER UN DOSSIER D’APPLICATIONS] Organiser vos applications dans un dossier vous permet de les trouver plus rapidement en permettant un accès direct depuis votre écran d’accueil. Pour créer un dossier, c’est très simple : 1. Exercez une pression prolongée de votre doigt sur l’icône de l’application à déplacer jusqu’à ce que l’écran se dédouble.2. Sans relâcher la pression de votre doigt, faites glisser l’icône au-dessus de celui d’une autre application. Un cercle blanc devrait apparaitre en dessous de votre doigt.3. Vous pouvez relâcher votre doigt. Les deux applications sont regroupées dans un même dossier. De la même manière, vous pourrez ajouter de nouvelles applications dans ce même dossier. ENLEVER UNE APPLICATION DE L'ÉCRAN D'ACCUEIL [ASTUCE ANDROID – ENLEVER UNE APPLICATION DE L’ÉCRAN D’ACCUEIL] Vous souhaitez supprimer une application de votre écran d’accueil, mais sans la désinstaller. C’est très simple : Exercez une pression prolongée de votre doigt sur l’icône de l’application que vous souhaitez supprimer de l’écran d’accueil. Faites la glisser jusqu’au bouton « supprimer » qui apparaît en haut à gauche de votre écran. Vous pouvez relâcher votre doigt. DÉSACTIVER LES NOTIFICATIONS D'UNE APPLICATION [ASTUCE ANDROID – DÉSACTIVER LES NOTIFICATIONS D’UNE APPLICATION (LOLIPOP 5.1.1)] Les notifications vous permettent d’être alertés mais peuvent être envahissantes, il peut donc parfois être utile de les désactiver. C’est très simple : 1. Ouvrez les « Paramètres » de votre téléphone depuis le menu principal.2. Ouvrez l’onglet « Sons et Notifications ».3. Ouvrez l’onglet « Notifications des applications ».4. Choisissez votre application.5. Vous pouvez choisir d’autoriser ou non l’application a générer différents types de notifications :– Aucune notification– Les afficher même lorsque le mode prioritaire est activé– Les afficher sur l’écran de verrouillageÀ noter que ces 2 derniers modes peuvent être complémentaires FERMER LES APPLICATIONS EN COURS DE FONCTIONNEMENT (GESTIONNAIRE DE TÂCHES) [ASTUCE ANDROID – GESTIONNAIRE DE TÂCHES] Quand vous retourner sur votre menu, les applications peuvent continuer de fonctionner en arrière plan. Cette activité prolongée peut réduire l’autonomie de votre batterie. Vous pouvez stopper l’activité d’une application grâce au gestionnaire de tâches. C’est très simple : 1. Touchez le bouton « carré » (Ou exercez deux pressions simultanées sur le bouton central si votre téléphone fonctionne sur une version d’Android antérieures à 5.1.1)2. Avec votre doigt, balayer vers la gauche ou vers la droite les applications dont vous souhaitez stopper l’activité UTILISER VOTRE TÉLÉPHONE COMME MODEM - PARTAGE DE CONNEXION [ASTUCE ANDROID – PARTAGE DE CONNEXION PAR CÂBLE, WIFI, BLUETOOTH] Vous êtes en déplacement et vous souhaitez vous connecter à Internet pour relever vos mails ou accéder à vos documents, votre smartphone a la capacité de partager sa connexion Internet avec un autre appareil comme un ordinateur par exemple. Pour profiter de cette fonctionnalité, vous devez disposer d’un abonnement adéquate (data) et d’un accès internet 3G/4G. Pour activer le partage, c’est très simple : WIFI / BLUETOOTH 1. Accédez aux « Paramètres » de votre téléphone depuis le menu principal.2. Sélectionnez la catégorie « Sans fil et réseaux ».3. Ouvrez l’onglet « Plus » puis « Partage connexion ».4. À la première utilisation, entrer dans « Paramètres du point d’accès WIFI »– Personnalisez le nom et le mot de passe de votre point d’accès– Retournez dans le menu « Partage de connexion »– Cochez la case de la ligne « Point d’accès Wi-Fi » ou Bluetooth en fonction de vos préférences. En recherchant un réseau wifi ou bluetooth depuis votre ordinateur ou tablette, vous verrez apparaitre le routeur de votre téléphone. Il suffira de s’y connecter grâce à votre mot de passe. USB 1. Connectez vos deux appareils grâce au port usb en OTG.2. Accédez aux « Paramètres » de votre smartphone en passant par le menu principal.3. Sélectionnez l’onglet « Plus » dans la catégorie « Sans fil et réseaux »4. Ouvrez l’onglet « Partage connexion »5. Activez la fonction « Via USB » LES WIDGETS[ASTUCE ANDROID – À QUOI SERVENT LES WIDGETS] Nombreux sont ceux qui se demandent à quoi servent les Widgets. En réalité, ils sont assez pratiques puisqu’ils permettent d’accéder à une application ou au contenu d’une application sans passer par celle-ci.Ils offrent alors différentes options de personnalisation pour vous offrir un aspect encore plus pratique et efficace directement depuis votre écran d’accueil.

How to use your phone as a modem, tethering
If you’re on the go and want to connect to the Internet to check your email or access your documents, your smartphone can share its Internet connection with another device, such as a computer. To use this feature, you’ll need a suitable data plan and 3G/4G Internet access. Activating this feature is very simple. WIFI / BLUETOOTH 1. Go to your phone’s “Settings” from the main menu. 2. Select the “Wireless & Networks” category. 3. Open the “More” tab, then “Tethering & Internet Sharing.” 4. The first time you use this feature, go to “Wi-Fi Hotspot Settings”: – Customize the name and password of your hotspot– Return to the “Internet Sharing” menu– Check the box next to “Wi-Fi Hotspot” or Bluetooth, depending on your preference. USB 1. Connect your two devices using the USB OTG port. 2. Go to your smartphone’s “Settings” via the main menu. 3. Select the “More” tab in the “Wireless & Networks” category 4. Open the “Tethering” tab 5. Enable the “Via USB” feature

How to turn off the sound/vibration of your touch keyboard
Would you like to turn off the sound and/or vibration of your keyboard keys? It’s very simple 1. Open your phone’s settings from the main menu. 2. Scroll down to the “Sounds & Notifications” tab and tap it. 3. Tap the “Other Sounds” tab. 4. You can choose to enable or disable the sound and vibration for your touchscreen keyboard.

Want to save a piece of information without having to write it down, or simply capture a friend’s Snapchat? Taking a screenshot is the best solution! CROSSCALL shows CROSSCALL how! 1. Press the Volume Down button and the Power button on your phone at the same time.2. Hold them down until you hear a click or see a "flash" on your screen.3. Find your screenshot in your Photo Gallery. It will also appear in the notification bar, which includes a preview of the screenshot. PS: Be careful—if you take a screenshot of a friend’s Snapchat, they’ll know about it too

How to remove an app from the home screen
You want to remove an app from your home screen without uninstalling it. It’s very simple 1. Press and hold your finger on the icon of the app you want to remove from the home screen. 2. Drag it to the “Remove” button that appears in the top-left corner of your screen. 3. You can release your finger.

Write your text messages hands-free
Whether you're driving, belaying a friend during a climbing session, or just feeling a bit lazy, thanks to the voice recognition technology built into Android phones, you can now write text messages without even touching your smartphone—all thanks to voice typing! Enabling voice typing To dictate text, you must first enable voice typing: Go to "Settings" then "Languages & Input." Tap "Current keyboard" and "Select keyboards." Enable "Google Voice Typing" under "Voice Output Mode" and then "On." Open the SMS app. Tap the microphone button on the right side of the keyboard. The message "Speak now" appears. Dictate your text clearly. If possible, avoid long sentences and complicated words that may not be included in the dictionary stored on your TREKKER-X3. As you dictate, the text appears automatically on the screen. Make corrections if necessary. Click Send. The “OK GOOGLE” method In addition to sending text messages, this feature allows you to perform various tasks using your voice (write an email, perform an internet search, check the weather, etc.). On the home screen of your TREKKER-X3, you’ll see a microphone icon to the right of the Google search bar. Tap it and say “Send text message to (*your contact’s name*)”. If this is your first time using it, Google will need access to the contacts saved on your device. Tap “Yes, I agree” to use this feature. Speak your text message clearly, making sure to pause briefly between each word. Android’s voice recognition system automatically creates a text message. All you have to do is tap “Send.” Equipment used TREKKER-X3

Import/export your contact list
This tip* explains how to back up your contact list so you can import it into your new CROSSCALL smartphone CROSSCALL export it from your old phone. 1. Open the "Contacts" app on your Android smartphone. 2. Tap the "three vertical dots" in the top-right corner. 3. Select “Import/Export.” 4. Choose the option you need from “Import from VCF file,” “Export to VCF file,” or “Share visible contacts,” which allows you to send your contacts directly via the app of your choice (Gmail, WhatsApp, etc.). EXPORTING CONTACTS 1. After clicking “Export to VCF file,” tap “OK” when prompted, and a .vcf file will be created in the root directory of your phone. Here, the file is named “00001.vcf.” 2. Next, import this file to your new CROSSCALL smartphone by following the steps explained above, and you’re all set! IMPORTING CONTACTS After clicking “Import from VCF file,” you’ll have the option to save your contacts to your “Phone” or your Gmail account. The second option will allow you to access your contacts from anywhere. *This tip was tested using the CROSSCALL .

Photos, videos, contacts: transfer all your data to your computer
There are a few simple ways to transfer all your personal data from your old device to your new CROSSCALL smartphone CROSSCALL music, videos, photos, ringtones, downloads, etc.). Follow the guide! VIA USB CABLE This is definitely the simplest method. Connect your device to your computer using your USB cable, X-DOCK your X-DOCK X-CABLE docking station X-CABLE your smartphone is equipped with X-LINK™ technology X-LINK™ Don’t forget to select the “Transfer files (MTP)” option from the list that appears. Transfer your data either to your computer or to your SD card, and retrieve it by following these simple steps: Retrieve the previously saved contact file (.vcf format), which should be located in the root directory of your phone. Back up the “DCIM,” “Pictures,” and “Video” folders for your photos, videos, and screenshots. If you own a TREKKER-X4, the file path will differ depending on whether you captured your videos using the Camera app or the X-CAM app X-CAM your Action Cam. Here it is: DCIM>Camera, for photos and videos captured with the Camera app. DCIM > Xcamera > Video > EXPORTED VIDEOS, for videos exported from the X-CAM app X-CAM your TREKKER-X4. 3. Copy your “Download” folder, which may contain downloaded and/or transferred files (always check). 4. Check the “media,” “Ringtones,” and “Sounds” folders to retrieve any music, audio recordings, and other ringtones you want to keep. If you’re transferring data from a Mac to your Android smartphone, you’ll need to download software like Android File Transfer. VIA THE CLOUD Install a cloud app on all your devices: your old and new smartphones, as well as your computer. The benefit of having your data synced in the cloud is that you can back it up across all your devices, regardless of their operating system. There are many solutions available, such as Dropbox, Microsoft OneDrive, Google Drive, etc. Apple’s iCloud can also be installed on a PC, but you’ll only be able to sync contacts, calendars, reminders, and emails. For everything else, you’ll need to download one or more specific apps from the Play Store, which may be free or paid. Upload your photos and videos to the app installed on one of your devices, and all the others will sync automatically! FOR PHOTOS & VIDEOS: GOOGLE PHOTOS This app is particularly easy to use. You can access all your photos and videos across all your devices, including your computer via the website. Download it from the Play Store if it isn’t already pre-installed on your phone. When you open the app for the first time, it will ask if you want to “back up and sync” your files. Tap “OK” and you’re all set. All your files are now backed up and synced across your devices.